
Looking for Iguana v.5 or v.6? Learn More or see the Help Center.
Creating the Tables |
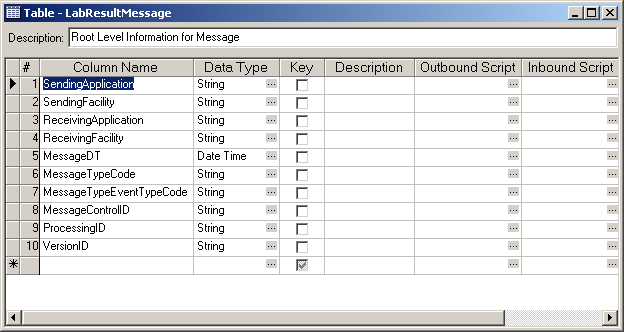
After you have created the message definition, the next step is to create the tables that will hold the data that has been extracted from the incoming messages. To do this:
- In the Toolbar, click Table. A table definition named Table0 appears in the Workspace panel.
- Right-click Table0, and select Rename. Rename the table LabResultMessage.
- Double-click LabResultMessage to display its table window.
- In the Description field, type Root Level Information for Message.
- Add rows to the table to make it look like this:

- To create this table, in the Column Name column, type the column names. In the Data Type column, use the ... (ellipsis) button in each row to select the data type.
- In the Toolbar, click Table. A table definition named Table0 appears in the Workspace panel.
- Right-click Table0, and select Rename. Rename the table NextOfKin.
- Double-click NextOfKin to display its table window. Add rows to the table to make it look like this:

- In the Toolbar, click Table. A table definition named Table0 appears in the Workspace panel.
- Right-click Table0, and select Rename. Rename the table Note.
- Double-click Note to display its table window. Add rows to the table to make it look like this:

- In the Toolbar, click Table. A table definition named Table0 appears in the Workspace panel.
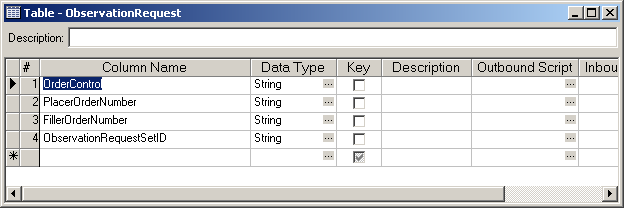
- Right-click Table0, and select Rename. Rename the table ObservationRequest.
- Double-click ObservationRequest to display its table window. Add rows to the table to make it look like this:

- In the Toolbar, click Table. A table definition named Table0 appears in the Workspace panel.
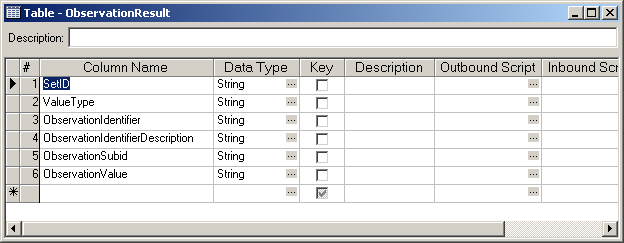
- Right-click Table0, and select Rename. Rename the table ObservationResult.
- Double-click ObservationResult to display its table window. Add rows to the table to make it look like this:

- In the Toolbar, click Table. A table definition named Table0 appears in the Workspace panel.
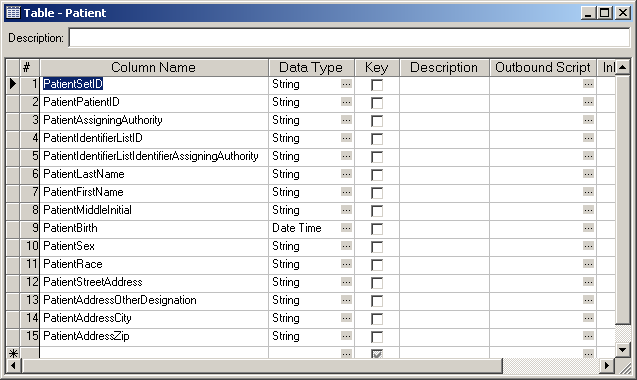
- Right-click Table0, and select Rename. Rename the table Patient.
- Double-click Patient to display its table window. Add rows to the table to make it look like this:
