
Setting Up an Oracle Database Instant Client |
If you plan to use Iguana to obtain data from or store data into an Oracle database, and you do not have an existing Oracle client, the easiest way to interact with the Oracle database is with an Oracle Database Instant Client. This Instant Client enables you to establish an ODBC connection to your Oracle database.
|
Be sure to use version 11.1 or later of the Oracle Database Instant Client. Version 10.2 of the Oracle Database Instant Client does not include all of the required DLL files. | ||
 |
To set up the Oracle Database Instant Client, you must:
- Install the Oracle Database Instant Client and its ODBC driver on your system;
- Set the TNS_ADMIN environment variable;
- Configure a tnsnames.ora configuration file for your client.
To install the Oracle Database Instant Client:
- Download the Oracle Database Instant Client from the Oracle web site. You will need the Basic and ODBC Supplement packages. Place these packages in a folder or directory on your computer (such as C:\Oracle).
- Unzip the packages that you have downloaded. The unzipped files will be copied into a subdirectory named instantclient_X_Y, where X and Y represent the version number of the Oracle Database Instant Client (for example, C:\Oracle\instantclient_11_1).
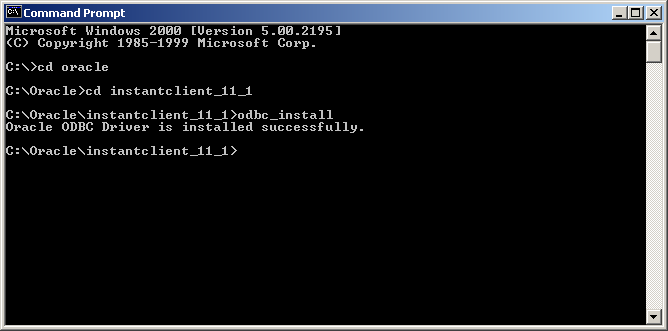
- Open a Command Prompt window, and set your current directory to be the instantclient_X_Y directory into which the unzipped files have been copied.
- Type odbc_install. This will install the ODBC driver on your system:

The next steps are to ensure that the necessary Windows environment variables are defined. You will need to:
- Create an environment variable named TNS_ADMIN, and set its value to be the directory that contains the Oracle Database Instant Client (for example, C:\Oracle);
- Ensure that the directory that contains the Oracle Database Instant Client is included in the PATH environment variable.
To define the necessary environment variables:
- From Windows, open the Control Panel and click System.
- Click the Advanced tab.
- Click Environment Variables.
- In the System variables panel, click New.
- In the Variable Name field, type TNS_ADMIN.
- In the Variable Value field, type the name of the directory that contains your Oracle Database Instant Client (for example, C:\Oracle).
- Click OK to create the environment variable. The Environment Variables window is now displayed again.
- In the System variables panel, locate the variable named Path or PATH. (If it does not exist, create it using the steps that you used above to create TNS_ADMIN.)
- Select the PATH environment variable, and click Edit.
- In the Edit System Variable window, in the Variable Value field, position your cursor at the end of the current list. Append a semi-colon ; to the list, then type the directory that contains your Oracle Database Instant Client.
- Click OK to close the Edit System Variable window.
- Click OK again to close the Environment Variables window.
- Click OK to close the System Properties window.
Next, you must create a tnsnames.ora configuration file for your Oracle Database Instant Client. This file should be located in the directory in which your Oracle Database Instant Client is installed (for example, C:\Oracle). The tnsnames.ora file should look like this:
MY_ORACLE_SOURCE =
    (DESCRIPTION =
        (ADDRESS_LIST =
            (ADDRESS = (PROTOCOL = TCP)(HOST = hostname)(PORT = portnum))
        ) (CONNECT_DATA =
            (SID = XE) (SERVER = DEDICATED)
        )
    )
|
In the definition shown above, replace MY_ORACLE_SOURCE with the name of your Oracle data source, replace hostname with the host name for your Oracle server, and replace portnum with the port on which your Oracle server is running.
The final step is to create a file named sqlnet.ora, located in the same directory as tnsnames.ora. In this file, add the following line:
TCP.CONNECT_TIMEOUT=5 |
This tells the Oracle client to time out if a connection to the Oracle server cannot be obtained within 5 seconds. (The default is to never time out, which can cause problems if the server is down or cannot be reached.)
Your Oracle client is now ready for use as an ODBC data source. See Setting Up an ODBC Data Source for Oracle for information on how to set up an ODBC data source for Oracle, and see Using an ODBC Oracle Data Source for information on how to use this data source in an Iguana channel.